

By guest blogger Rita Wetzel
Introduction
You can use Sweet Pea’s Continuous Designs and Square Quilted Designs to transform a traditionally pieced top into a beautiful quilted runner, wall hanging, or quilt.
Over the years I have learned that making a table runner, a wall hanging, or a quilt really consists of three projects. First, there is the fabric and pattern selection. Second, is the cutting and piecing. Third is the quilting and binding. The pieced top can be sent to a long-arm quilter, it can be finished with stitch-in-the-ditch, ruler work, or free motion quilting on a domestic machine, or it can be added to the UFO pile!
With Sweet Pea’s Continuous and Square Quilting Designs you can now quilt a pieced top on your embroidery machine! There are three steps to accomplishing this. First you will need to prep the quilt sandwich. Then you will need to prep the quilting design. And finally, you do the actual embroidery.
Prep the Quilt Sandwich
I have found that prepping the quilt sandwich can be one of the most frustrating steps in the whole process. It requires lots of patience.
The quilt sandwich is 3 layers - the top, the batting, and the backing. The batting and backing both need to be cut larger than the top. Cut 5 to 6 inches larger all the way around.
I spray baste all of my quilt sandwiches. Start with the top and the batting. Center the top on the batting. Apply the basting spray to a section and smooth out. Start in the middle and smooth out towards the edges section by section.

Once the entire top is completed, turn it over so the batting is on top. You may be surprised at the wrinkles and waves in the batting. This is normal.

Smooth out the batting. Turn it over again - you may find more wrinkles! You may need to smooth out each side multiple times - frustrating, but normal.

Once you are finished with the top and batting, place the top/batting in the center of the backing. Repeat the spraying and smoothing process until your 3 layer sandwich is relatively smooth. The more wrinkles you can smooth out, the happier you will be with your finished project.
The next step is to iron the quilt sandwich. This will set the top/batting/backing. The ironing will also finish the smoothing process and correct the last of those stubborn wrinkles. Start with the middle of the quilt and iron out. I iron the back first and then the front.

The last step in the quilting prep process is to stitch-in-the-ditch along a few of the seams both vertically and horizontally. This keeps the sandwich together while embroidering. Also, stitch close to the edge all the way around the quilt. If you plan on leaving the stitching in, use a normal stitch length. If you plan on taking it out, then use a basting stitch so it is easier to remove.


Prep the Design Layout
Decide which design and block size you are going to use. For this wall hanging I used the Swirls Designs in the 5x7 size.
Stitch out a handful of designs on tear away stabilizer. Trim right on the outline stitch.

Now it is time to mark where each design repeat will be embroidered. Be sure to test a scrap piece of fabric from your quilt top to ensure that your marking pen/pencil will wash out afterwards. Start at the center. Then mark above and below for the entire center vertical row. I only mark one vertical row at a time.


When laying out the templates for marking, I alternate the position of the designs from vertical row to vertical row. This results in a more pleasing look to the eye.

Embroider the Design
Finally - we can move to the embroidery machine.
Use a good polyester embroidery top thread. Use the same in the bobbin or a polyester bobbin thread. I used Isacord 40 wt thread for the top and Superior Bottom Line 60 wt for the bobbin.
Using the markings from the previous steps, pin your template on the quilt top. If you have positioning capabilities on your machine use that feature to ensure the design is correctly aligned. If using hoops, use the markings on the hoop to center your design.


Stitch out all of the blocks in a vertical row. Then mark the next vertical row and stitch. Repeat until finished. When you get to the edge of your quilt, the design may extend beyond the edge; thus, the additional 5 to 6 inches of batting/backing. It will be trimmed off when you trim it for the binding. (If by chance you find don’t have enough fabric, just sew a piece of scrap fabric to the edge.)
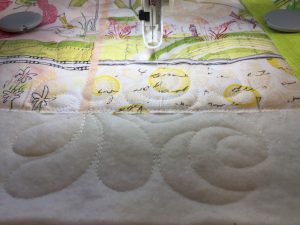
Here is a closeup of the finished quilted top and back using SweetPea’s Swirls Quilting Design. The consistent, well-spaced design surely looks like is was done by a professional quilter.


All that is left now is to bind it and hang it!
1 comment
Jane Schloss
I put the wadding in the dryer for five minutes before I use it. This makes it wrinkle free and also has the added benefit of making it very clingy which helps with the sandwiching.